Showing posts with label Computer En. Show all posts

Wednesday, March 25, 2020

How to permanently turn off Windows 10 updates? Try This.

If you want to know the latest way to permanently turn off Windows 10 Update, you can try this tutorial. We have tried this tutorial on [Windows 10 Home Version 1903 (OS Build 18362.30)] and it worked.
How to turn off Windows 10 auto update by force to save internet quota. Tutorial on saving quota on Windows 10, turn off permanent updates, tips, tricks effective, steps, easy, fast, effective, sure way, turn off updates forever, stop downloading Windows 10 updates forever

How to permanently turn off Windows 10 updates?

There are 4 steps to permanently turn off Windows 10 Update.
  • Step 1 using Services (services.msc).
  • Step 2 using the Registry Editor (regedit).
  • Step 3 using File Explorer.
  • Step 4 using the Command Prompt.

A. Step 1: by using Services (services.msc).

1. Press the [Windows+R] Button or use [Start-Run] to open the Run Command.

2. Type [services.msc] to run the [Services] feature.

How to turn off Windows 10 auto update by force to save internet quota. Tutorial on saving quota on Windows 10, turn off permanent updates, tips, tricks effective, steps, easy, fast, effective, sure way, turn off updates forever, stop downloading Windows 10 updates forever

3. Select the [Windows Updates] option in the right hand column, and double-click it so that the [Windows Update Properties (Local Computer)] window appears.

4. On the [General] tab, for the [Startup type] section, select the [Disabled] option. After that, press the [Stop] button.

How to turn off Windows 10 auto update by force to save internet quota. Tutorial on saving quota on Windows 10, turn off permanent updates, tips, tricks effective, steps, easy, fast, effective, sure way, turn off updates forever, stop downloading Windows 10 updates forever

5. Select the [Recovery] tab. In the [First failure] section, change the [Restart the Service] option to [Take No Action]. Click the [Apply] and [OK] button.

How to turn off Windows 10 auto update by force to save internet quota. Tutorial on saving quota on Windows 10, turn off permanent updates, tips, tricks effective, steps, easy, fast, effective, sure way, turn off updates forever, stop downloading Windows 10 updates forever

B. Step 2: Using the Registry Editor (regedit).

We will change the data in the [wuauserv, WaaSMedicSvc, UsoSvc] section.

1. Press the [Windows+R] button or use [Start-Run] to open [Run Command].

2. Type [regedit] to run [Registry Editor].

3. Follow the navigation below:
HKEY_LOCAL_MACHINE\SYSTEM\CurrentControlSet\Services\wuauserv

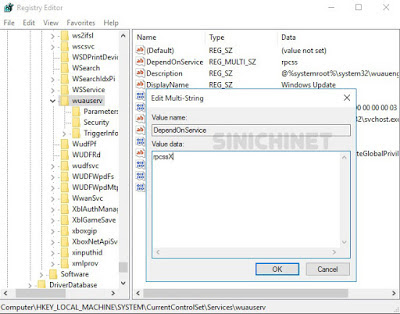
4. Change the data on [DependOnService] and [ImagePath].
  • DependOnService : change [rpcss] to [rpcssX].
  • ImagePath : change [%systemroot%\system32\svchost.exe -k netsvcs] to [%systemroot%\system32\svchostX.exe -k netsvcs]
How to turn off Windows 10 auto update by force to save internet quota. Tutorial on saving quota on Windows 10, turn off permanent updates, tips, tricks effective, steps, easy, fast, effective, sure way, turn off updates forever, stop downloading Windows 10 updates forever

How to turn off Windows 10 auto update by force to save internet quota. Tutorial on saving quota on Windows 10, turn off permanent updates, tips, tricks effective, steps, easy, fast, effective, sure way, turn off updates forever, stop downloading Windows 10 updates forever

5. Follow the navigation below:
HKEY_LOCAL_MACHINE\SYSTEM\CurrentControlSet\Services\WaaSMedicSvc

6. Double-click on the [Start] section, and change the number [3] to [4]. Then change the data on [DependOnService] and [ImagePath].
  • DependOnService : change [rpcss] to [rpcssX].
  • ImagePath : change [%systemroot%\system32\svchost.exe -k netsvcs] to [%systemroot%\system32\svchostX.exe -k netsvcs]

7. Follow the navigation below:
HKEY_LOCAL_MACHINE\SYSTEM\CurrentControlSet\Services\UsoSvc


8. Double-click on the [Start] section, and change the number [3] to [4]. Then change the data on [DependOnService] and [ImagePath].
  • DependOnService : change [rpcss] to [rpcssX].
  • ImagePath : change [%systemroot%\system32\svchost.exe -k netsvcs] to [%systemroot%\system32\svchostX.exe -k netsvcs]

C. Step 3 : Using File Explorer.

1. Press the [Windows+E] button or use [Start-Windows System-File Explorer].

2. Follow the following navigation: C:\Windows\SoftwareDistribution.

3. Delete all folders & files contained in the Download folder.

The next step is: take over [permission] from [System] on the file:
  • wuaueng.dll
  • wuauclt.exe
  • WaaSMedicAgent.exe
  • WaaSMedicSvc.dll
  • WaaSMedicCapsule.dll
  • WaaSMedicPS.dll
  • UsoClient.exe
  • usosvc.dll

All files can be found at C:\Windows\System32\

4. Find the [wuaueng.dll] file by following this navigation:
C:\Windows\System32\wuaueng.dll

5. Right-click on the file and select the [Properties] option. Then select the [Security] tab, and click the [Advance] button to open the [Advance Security Settings] window.

How to turn off Windows 10 auto update by force to save internet quota. Tutorial on saving quota on Windows 10, turn off permanent updates, tips, tricks effective, steps, easy, fast, effective, sure way, turn off updates forever, stop downloading Windows 10 updates forever

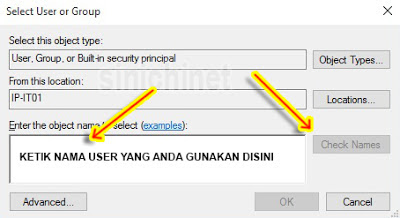
6. In the [Owner] section, click on [Change]. Type your username, then press the [Check Names] button, then the [OK] button. Continue clicking the [OK] button next, until the [Properties] window closes. We must close the [Properties] window first so that the addition of the user name that we did earlier was processed by the Windows system.

How to turn off Windows 10 auto update by force to save internet quota. Tutorial on saving quota on Windows 10, turn off permanent updates, tips, tricks effective, steps, easy, fast, effective, sure way, turn off updates forever, stop downloading Windows 10 updates forever

7. Repeat method No.5 for the [wuaueng.dll] file to open the [Advance Security Settings] window again.

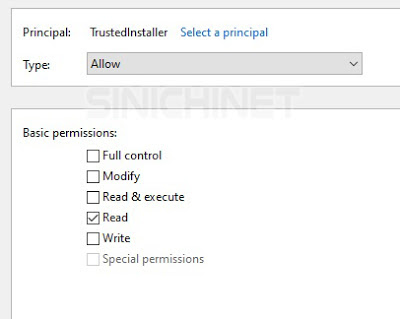
8. Double click on one of the names in the Principal column (such as TrustedInstaller), so that the [Permission Entry] window appears. Remove all check marks except for the read section in the [Basic Permission] section Then press the OK button.

How to turn off Windows 10 auto update by force to save internet quota. Tutorial on saving quota on Windows 10, turn off permanent updates, tips, tricks effective, steps, easy, fast, effective, sure way, turn off updates forever, stop downloading Windows 10 updates forever

9. Perform step no.8 on all [Principal]. Then click the [Apply] and [OK] button. Continue clicking the [OK] button until the [Properties] window closes.

10. Repeat steps No.5 through No.9 for all of the following files: wuauclt.exe, WaaSMedicAgent.exe, WaaSMedicSvc.dll, WaaSMedicCapsule.dll, WaaSMedicPS.dll, UsoClient.exe, and usosvc.dll.

D. Step 4 : Using Command Prompt.

1. Follow the navigation below: Start - Windows System - Command Prompt.

2. Run [Command Prompt] as [Administrator].

3. Type or copy the command below then press Enter.
takeown /f "%windir%\System32\UsoClient.exe" /a

4. Continue by typing or copy the command below and press Enter.
icacls "%windir%\System32\UsoClient.exe" /inheritance:r /remove "Administrators" "Authenticated Users" "Users" "System"

Note: If you want to run the [UsoClient] feature again, because you want to update Windows, you can use the following command:
icalcs "%windir%\System32\UsoClient.exe" /reset

5. Restart your computer.

Hopefully this article can be useful for those of you who need it.

Saturday, August 17, 2019

Beheben des Fehlers [Cannot Create File] beim Öffnen eines Anhangs in Microsoft Outlook

Haben Sie jemals ein Problem beim Öffnen eines E-Mail-Anhangs in Microsoft Outlook festgestellt?

Cannot create file: Example.xls. Right-click the folder you want to create the file in, and then click Properties on the shortcut menu to check your permissions for the folder.

Beheben des Fehlers "Datei kann nicht erstellt werden" beim Öffnen von Anhängen In Outlook können Outlook-Anhänge nicht gespeichert, nicht geöffnet, Outlook-E-Mail-Anhänge nicht gespeichert werden, Anhangsfehler, How To Solve “Can’t Create File” Error When Opening Attachment On Outlook, outlook attachments cannot be saved, cannot be opened, cannot save outlook email attachments, attachment error

Warum tritt das Problem [Can’t create file: filename] auf?

Dieses Problem tritt normalerweise auf, weil Outlook nicht auf die zugeordnete temporäre Datei zugreifen kann, sodass Sie Outlook-E-Mail-Anhänge nicht speichern können. Gehen Sie folgendermaßen vor um dieses Problem zu beheben:

1. Drücken Sie die Taste [Windows + R] oder [Start » Run], um [Run Command] zu öffnen.

2. Geben Sie [regedit] ein, um den [Registry Editor] auszuführen.

3. Klicken Sie auf [Edit » Find] und geben Sie OutlookSecureTempFolder ein. Oder folgen Sie einfach der folgenden Navigation:
HKEY_CURRENT_USER\Software\Microsoft\Office\<version*>\Outlook\Security

Hinweis: <Version *> ist die Version von Microsoft Outlook, die Sie verwenden. Wenn Sie Outlook 2016 verwenden, heißt es 16.0. Beispiel: HKEY_CURRENT_USER\Software\Microsoft\Office\16.0\Outlook\Security

4. Klicken Sie zweimal auf [OutlookSecureTempFolder]. Das Fenster [Edit String] wird angezeigt. Dort finden Sie den Speicherort der temporären Outlook-Datei. Es ist möglich, dass dies einer der folgenden Standorte ist:

  • C:\Documents and Settings\ username \Local Settings\Temporary Internet Files\Content.Outlook
  • C:\Documents and Settings\username\Local Settings\Temporary Internet Files\OLKfoldername
  • C:\Documents and Settings\username\Local Settings\Temporary Internet Files\OLKrandomnumber
  • C:\Users\username\AppData\Local\Microsoft\Windows\Temporary Internet Files\Content.Outlook
  • C:\Users\username\AppData\Local\Microsoft\Windows\INetCache\ Content.Outlook\randomnumber

5. Nachdem Sie den genauen Speicherort der Datei [OutlookSecureTempFolder] gefunden haben, öffnen Sie [Windows Explorer] und navigieren Sie zu dem zuvor aufgelisteten Speicherort. Löschen Sie alle Dateien im Ordner.

6. Starten Sie Ihr Microsoft Outlook neu

Wednesday, August 14, 2019

How To Solve “Cannot Create File” Error When Opening Attachment On Microsoft Outlook Outlook

Have you ever experienced a problem, when you want to open an email attachment in Microsoft Outlook, a warning appears:

Cannot create file: Example.xls. Right-click the folder you want to create the file in, and then click Properties on the shortcut menu tocheck your permissions for the folder.

How To Solve “Can’t Create File” Error When Opening Attachment On Outlook, outlook attachments cannot be saved, cannot be opened, cannot save outlook email attachments, attachment error

Why does this "Can’t create file: filename" problem occur?

This problem usually occurs because Outlook cannot access the linked temp file so you cannot save Outlook email attachments. To resolve this problem, try the following steps:

1. Press the [Windows + R] button, or [Start » Run] to open [Run Command].

2. Type regedit to run [Registry Editor].

3. Click [Edit » Find] and type OutlookSecureTempFolder. Or you can simply follow the following navigation:
HKEY_CURRENT_USER\Software\Microsoft\Office\<version*>\Outlook\Security

Note: <version *> is the version of Microsoft Outlook that you are using. If you use Outlook 2016 then it says 16.0. Example: HKEY_CURRENT_USER\Software\Microsoft\Office\16.0\Outlook\Security

4. Click 2x on [OutlookSecureTempFolder] and the [Edit String] window will appear.
There, you will find where the Outlook Temporary File is located. There is a possibility it could be from one of the following locations:

  • C:\Documents and Settings\ username \Local Settings\Temporary Internet Files\Content.Outlook
  • C:\Documents and Settings\username\Local Settings\Temporary Internet Files\OLKfoldername
  • C:\Documents and Settings\username\Local Settings\Temporary Internet Files\OLKrandomnumber
  • C:\Users\username\AppData\Local\Microsoft\Windows\Temporary Internet Files\Content.Outlook
  • C:\Users\username\AppData\Local\Microsoft\Windows\INetCache\ Content.Outlook\randomnumber

5. After finding the exact location of the [OutlookSecureTempFolder] file, open [Windows Explorer] and navigate to the location previously listed. Delete all files in the folder.

6. Restart your Microsoft Outlook

Saturday, August 3, 2019

How To Fix [Error 1935] When Installing Microsoft Office 2013 & 2016 On Microsoft Windows 10

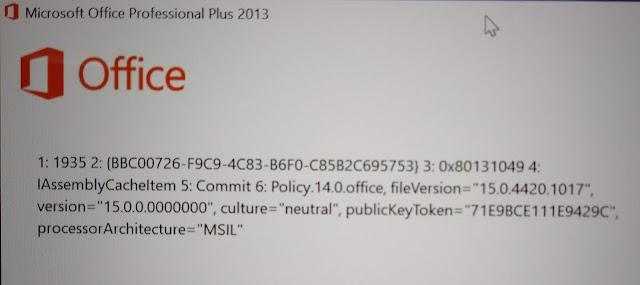
Have you ever experienced an error when installing Microsoft Office Professional Plus 2013 or 2016 on Windows10, and a warning appears as below?

1: 1935 2: {BBC00726-F9C9-4C83-B6F0-C85B2C695753) 3: 0x80131049 4:
IAssemblyCacheltem 5: Commit 6: Policy.14.0.office, fileVersion= "15.0.4420.1017",
version="15.0.0.0000000", culture= "neutral", publicKeyToken="71E9BCE111E9429C",
processorAfchitecture="MSIL"


How to fix "Error 1935" when installing Microsoft Office 2013 & 2016 on Microsoft Windows 10, Easy Ways to Resolve Errors When Installing Microsoft Office 2013 and 2016 on Microsoft Windows 10, error 1: 1935, how to, tips, tricks, tutorials,

If you are facing this problem, don't panic. Try the tutorial that we present below. These tips are guaranteed to be 98% successful, and we've tried it on Microsoft Windows Version 1809 (OS Build 17763.195).

How to fix "Error 1935" when installing Microsoft Office 2013 & 2016 on Microsoft Windows 10?

1. Press the [Windows + R] Button, or through Start - Run to open the Run Command.
2. Type regedit to run the Registry Editor feature.

How to fix "Error 1935" when installing Microsoft Office 2013 & 2016 on Microsoft Windows 10, Easy Ways to Resolve Errors When Installing Microsoft Office 2013 and 2016 on Microsoft Windows 10, error 1: 1935, how to, tips, tricks, tutorials,

3. Follow the navigation: Computer\HKEY_LOCAL_MACHINE\SOFTWARE\Microsoft\AppModel
4. Change (Rename) AppModel to AppModel.old
5. Restart the computer and try again to install your Microsoft Office.

Okay, thus the article "How to fix "Error 1935" when installing Microsoft Office 2013 & 2016 on Microsoft Windows 10". Hopefully this article useful for you.

Saturday, June 15, 2019

Hoe Bestanden En Mappen Die Verborgen Zijn Door Een Virus Te Herstellen (Door Notepad Te Gebruiken)

Computergebruikers op basis van Windows OS moeten bekend zijn met Computer Virus. En een van de slechte dingen die door deze virussen wordt veroorzaakt, is het verlies van gegevens en mappen op onze harde schijf, geheugen en pendrive.

Het moet erg vervelend zijn als onze belangrijke gegevens zoals kantoorwerk, schoolwerk, proefschrift of gedenkwaardige foto's plotseling verloren gaan. Hoewel de gegevens / map eigenlijk niet echt verloren is, alleen verborgen op dezelfde plek door het virus.

Hoe bestanden en mappen die verborgen zijn door een virus te herstellen (door Notepad te gebruiken)?

Voordat u verloren bestanden / mappen herstelt, moet u eerst controleren of uw antivirus is bijgewerkt. Waarom? omdat als de antivirus op uw computer niet correct werkt, het bestand dat u later hebt gevonden, weer door het virus wordt verborgen. En natuurlijk willen we niet dat dit gebeurt.

Ik gebruik tegelijkertijd twee antivirusprogramma's, Avast en SmadAV. Beide antivirussen interfereren niet met elkaar, integendeel, het zal elkaar aanvullen.

Nou, laten we teruggaan naar het grootste probleem. Er zijn eigenlijk verschillende manieren om bestanden / mappen te herstellen die zijn verborgen door een virus, maar deze keer gebruiken we Kladblok.

Volg de stappen:

1. Open Kladblok. In Windows7 bevindt Kladblok zich in: Start -> All Programs -> Accessories -> Notepad.

2. Typ het commando. Typ "attrib -s -h -r *. * / S / d" (zonder aanhalingstekens) in Kladblok, sla het op en geef het een naam zoals je wilt.

Hoe verborgen bestanden en mappen te herstellen met Kladblok, antivirus, verborgen bestanden, verloren bestanden, windows, txt, bat, attrib, tutorial, gids, tips, trucs, verloren bestanden herstellen, attrib -s -h -r *. * / s / d, virusaanval

3. Wijzig de extensie. Wijzig de extensie van .txt naar .bat, zoals: hidden.txt wordt hidden.bat

Hoe verborgen bestanden en mappen te herstellen met Kladblok, antivirus, verborgen bestanden, verloren bestanden, windows, txt, bat, attrib, tutorial, gids, tips, trucs, verloren bestanden herstellen, attrib -s -h -r *. * / s / d, virusaanval

4. Kopieer het bestand. Kopieer het .bat-bestand naar het station of pendrive waar het verloren bestand / map zich bevindt.

5. Excecute Command. Druk 2x op het .bat-bestand en wacht totdat het opdrachtpromptvenster verdwijnt. Hierna zullen de bestanden die door het virus zijn verborgen opnieuw verschijnen.

Hopelijk kan deze tutorial je helpen.

Thursday, June 13, 2019

Hoe te repareren "Firefox Is Already Running" Foutbericht

Heb je ooit Mozilla Firefox gestart maar er verschijnt een waarschuwingsbericht?
De waarschuwing is "Firefox is already running, but is not responding. To open a new window, you must first close the existing Firefox process, or restart your system."

Als u het bovenstaande probleem tegenkomt, is er een eenvoudige manier om het op te lossen.

Hoe te repareren "Firefox is al actief" Foutmelding, Windows, browser, applicatie, probleemoplossing, zelfstudie, tips, handleiding, Firefox Is Already Running, firefox error massage


Hoe te repareren ""Firefox Is Already Running" Foutbericht?

# Alt + Ctrl + Del. Druk tegelijkertijd op de toetsen Alt, Ctrl en Del op uw toetsenbord totdat een blauw scherm verschijnt. Selecteer de optie "Start Task Manager".

# Windows Task Manager. Zodra het venster "Windows Task Manager" verschijnt, opent u het tabblad "Processes" en selecteert u "firefox.exe".

# End Process. Nadat u "firefox.exe" hebt geselecteerd, drukt u op de knop "End Process" of "End Task"

Hoe te repareren "Firefox is al actief" Foutmelding, Windows, browser, applicatie, probleemoplossing, zelfstudie, tips, handleiding, Firefox Is Already Running, firefox error massage

# Bevestigingsvenster. Als het bevestigingsvenster "Windows Task Manager" verschijnt, drukt u nogmaals op de knop "End Process".

Hoe te repareren "Firefox is al actief" Foutmelding, Windows, browser, applicatie, probleemoplossing, zelfstudie, tips, handleiding, Firefox Is Already Running, firefox error massage

U kunt uw favoriete browser "Firefox Mozilla" opnieuw openen.

Hopelijk kan dit artikel nuttig zijn om u te helpen.

Sunday, April 14, 2019

How to Block USB-Storage (pen drives & External Hard Drive) on Windows 7, 8 and 10

If you ask, what are the benefits of blocking USB-Storage, or blocking a Pen Drive and an external hard drive? Actually there are many benefits, but the two most important are:

  1. Securing or preventing theft of important data & documents on a computer by using USB-storage.
  2. Preventing transmission of viruses from pendrive & external hard drives.
How to Block USB-Storage (pen drives & External Hard Drive) on Windows 7, 8 and 10?

There are 2 easy ways, using the Registry Editor & Local Group Policy Editor in Windows. You can chose one of them.

A. Using Registry Editor (regedit)

  1. Press Windows+ R keys or through Start - Run to open Run Command.
  2. Type regedit to run the Registry Editor.
  3. Follow the following navigation: HKEY_LOCAL_MACHINE \ SYSTEM \ CurrentControlSet \ Services \ USBSTOR
  4. In the right column, click 2x on Start.
  5. In the Value data section, change the number 3 to number 4. Click the OK button.

how to block Pen drives, flasdisk, external hard drive, tips, tricks, win7, win10, prevent the spread of flashdisk viruses, prevent data theft


B. Using the Local Group Policy Editor (gpedit.msc)
  1. Press Windows+ R keys or through Start - Run to open Run Command.
  2. Type gpedit.msc to run the Local Group Policy Editor.
  3. Follow the following navigation: Computer Configuration \ Administrator Templates \ System \ Removable Storage Access.
  4. In the right column, click 2x on All Removeable Storage classes: Deny all access
  5. Select the Enable option, and click Apply.
how to block Pen drives, flasdisk, external hard drive, tips, tricks, win7, win10, prevent the spread of flashdisk viruses, prevent data theft


That's the tutorial How to Block USB-Storage (pen drives & External Hard Drive) on Windows 7, 8 and 10. Hopefully it can be useful for you.