If you want to know the latest way to permanently turn off Windows 10 Update, you can try this tutorial. We have tried this tutorial on [Windows 10 Home Version 1903 (OS Build 18362.30)] and it worked.
There are 4 steps to permanently turn off Windows 10 Update.
1. Press the [Windows+R] Button or use [Start-Run] to open the Run Command.
2. Type [services.msc] to run the [Services] feature.
3. Select the [Windows Updates] option in the right hand column, and double-click it so that the [Windows Update Properties (Local Computer)] window appears.
4. On the [General] tab, for the [Startup type] section, select the [Disabled] option. After that, press the [Stop] button.
5. Select the [Recovery] tab. In the [First failure] section, change the [Restart the Service] option to [Take No Action]. Click the [Apply] and [OK] button.
We will change the data in the [wuauserv, WaaSMedicSvc, UsoSvc] section.
1. Press the [Windows+R] button or use [Start-Run] to open [Run Command].
2. Type [regedit] to run [Registry Editor].
3. Follow the navigation below:
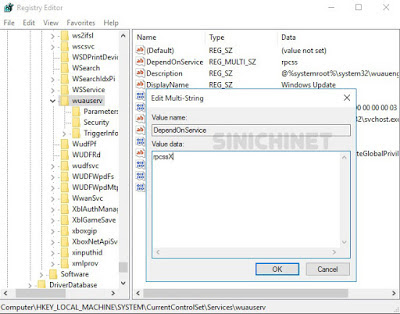
4. Change the data on [DependOnService] and [ImagePath].
5. Follow the navigation below:
6. Double-click on the [Start] section, and change the number [3] to [4]. Then change the data on [DependOnService] and [ImagePath].
7. Follow the navigation below:
8. Double-click on the [Start] section, and change the number [3] to [4]. Then change the data on [DependOnService] and [ImagePath].
1. Press the [Windows+E] button or use [Start-Windows System-File Explorer].
2. Follow the following navigation: C:\Windows\SoftwareDistribution.
3. Delete all folders & files contained in the Download folder.
4. Find the [wuaueng.dll] file by following this navigation:
5. Right-click on the file and select the [Properties] option. Then select the [Security] tab, and click the [Advance] button to open the [Advance Security Settings] window.
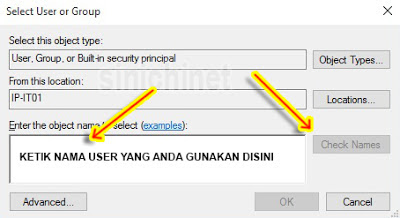
6. In the [Owner] section, click on [Change]. Type your username, then press the [Check Names] button, then the [OK] button. Continue clicking the [OK] button next, until the [Properties] window closes. We must close the [Properties] window first so that the addition of the user name that we did earlier was processed by the Windows system.
7. Repeat method No.5 for the [wuaueng.dll] file to open the [Advance Security Settings] window again.
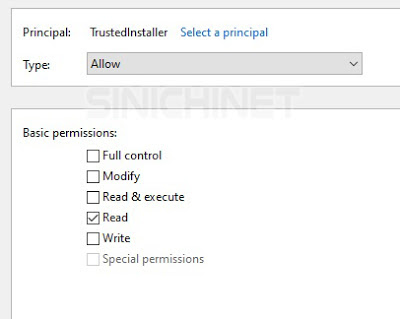
8. Double click on one of the names in the Principal column (such as TrustedInstaller), so that the [Permission Entry] window appears. Remove all check marks except for the read section in the [Basic Permission] section Then press the OK button.
9. Perform step no.8 on all [Principal]. Then click the [Apply] and [OK] button. Continue clicking the [OK] button until the [Properties] window closes.
10. Repeat steps No.5 through No.9 for all of the following files: wuauclt.exe, WaaSMedicAgent.exe, WaaSMedicSvc.dll, WaaSMedicCapsule.dll, WaaSMedicPS.dll, UsoClient.exe, and usosvc.dll.
1. Follow the navigation below: Start - Windows System - Command Prompt.
2. Run [Command Prompt] as [Administrator].
3. Type or copy the command below then press Enter.
4. Continue by typing or copy the command below and press Enter.
5. Restart your computer.
Hopefully this article can be useful for those of you who need it.
How to permanently turn off Windows 10 updates?
There are 4 steps to permanently turn off Windows 10 Update.
- Step 1 using Services (services.msc).
- Step 2 using the Registry Editor (regedit).
- Step 3 using File Explorer.
- Step 4 using the Command Prompt.
A. Step 1: by using Services (services.msc).
1. Press the [Windows+R] Button or use [Start-Run] to open the Run Command.
2. Type [services.msc] to run the [Services] feature.
3. Select the [Windows Updates] option in the right hand column, and double-click it so that the [Windows Update Properties (Local Computer)] window appears.
4. On the [General] tab, for the [Startup type] section, select the [Disabled] option. After that, press the [Stop] button.
5. Select the [Recovery] tab. In the [First failure] section, change the [Restart the Service] option to [Take No Action]. Click the [Apply] and [OK] button.
B. Step 2: Using the Registry Editor (regedit).
We will change the data in the [wuauserv, WaaSMedicSvc, UsoSvc] section.
1. Press the [Windows+R] button or use [Start-Run] to open [Run Command].
2. Type [regedit] to run [Registry Editor].
3. Follow the navigation below:
HKEY_LOCAL_MACHINE\SYSTEM\CurrentControlSet\Services\wuauserv
4. Change the data on [DependOnService] and [ImagePath].
- DependOnService : change [rpcss] to [rpcssX].
- ImagePath : change [%systemroot%\system32\svchost.exe -k netsvcs] to [%systemroot%\system32\svchostX.exe -k netsvcs]
5. Follow the navigation below:
HKEY_LOCAL_MACHINE\SYSTEM\CurrentControlSet\Services\WaaSMedicSvc
6. Double-click on the [Start] section, and change the number [3] to [4]. Then change the data on [DependOnService] and [ImagePath].
- DependOnService : change [rpcss] to [rpcssX].
- ImagePath : change [%systemroot%\system32\svchost.exe -k netsvcs] to [%systemroot%\system32\svchostX.exe -k netsvcs]
7. Follow the navigation below:
HKEY_LOCAL_MACHINE\SYSTEM\CurrentControlSet\Services\UsoSvc
8. Double-click on the [Start] section, and change the number [3] to [4]. Then change the data on [DependOnService] and [ImagePath].
- DependOnService : change [rpcss] to [rpcssX].
- ImagePath : change [%systemroot%\system32\svchost.exe -k netsvcs] to [%systemroot%\system32\svchostX.exe -k netsvcs]
C. Step 3 : Using File Explorer.
1. Press the [Windows+E] button or use [Start-Windows System-File Explorer].
2. Follow the following navigation: C:\Windows\SoftwareDistribution.
3. Delete all folders & files contained in the Download folder.
The next step is: take over [permission] from [System] on the file:
All files can be found at C:\Windows\System32\
- wuaueng.dll
- wuauclt.exe
- WaaSMedicAgent.exe
- WaaSMedicSvc.dll
- WaaSMedicCapsule.dll
- WaaSMedicPS.dll
- UsoClient.exe
- usosvc.dll
All files can be found at C:\Windows\System32\
4. Find the [wuaueng.dll] file by following this navigation:
C:\Windows\System32\wuaueng.dll
5. Right-click on the file and select the [Properties] option. Then select the [Security] tab, and click the [Advance] button to open the [Advance Security Settings] window.
6. In the [Owner] section, click on [Change]. Type your username, then press the [Check Names] button, then the [OK] button. Continue clicking the [OK] button next, until the [Properties] window closes. We must close the [Properties] window first so that the addition of the user name that we did earlier was processed by the Windows system.
7. Repeat method No.5 for the [wuaueng.dll] file to open the [Advance Security Settings] window again.
8. Double click on one of the names in the Principal column (such as TrustedInstaller), so that the [Permission Entry] window appears. Remove all check marks except for the read section in the [Basic Permission] section Then press the OK button.
9. Perform step no.8 on all [Principal]. Then click the [Apply] and [OK] button. Continue clicking the [OK] button until the [Properties] window closes.
10. Repeat steps No.5 through No.9 for all of the following files: wuauclt.exe, WaaSMedicAgent.exe, WaaSMedicSvc.dll, WaaSMedicCapsule.dll, WaaSMedicPS.dll, UsoClient.exe, and usosvc.dll.
D. Step 4 : Using Command Prompt.
1. Follow the navigation below: Start - Windows System - Command Prompt.
2. Run [Command Prompt] as [Administrator].
3. Type or copy the command below then press Enter.
takeown /f "%windir%\System32\UsoClient.exe" /a
4. Continue by typing or copy the command below and press Enter.
icacls "%windir%\System32\UsoClient.exe" /inheritance:r /remove "Administrators" "Authenticated Users" "Users" "System"
Note: If you want to run the [UsoClient] feature again, because you want to update Windows, you can use the following command:
icalcs "%windir%\System32\UsoClient.exe" /reset
5. Restart your computer.
Hopefully this article can be useful for those of you who need it.


