Showing posts with label Computer En. Show all posts

Wednesday, March 25, 2020

How to permanently turn off Windows 10 updates? Try This.

If you want to know the latest way to permanently turn off Windows 10 Update, you can try this tutorial. We have tried this tutorial on [Windows 10 Home Version 1903 (OS Build 18362.30)] and it worked.
How to turn off Windows 10 auto update by force to save internet quota. Tutorial on saving quota on Windows 10, turn off permanent updates, tips, tricks effective, steps, easy, fast, effective, sure way, turn off updates forever, stop downloading Windows 10 updates forever

How to permanently turn off Windows 10 updates?

There are 4 steps to permanently turn off Windows 10 Update.
  • Step 1 using Services (services.msc).
  • Step 2 using the Registry Editor (regedit).
  • Step 3 using File Explorer.
  • Step 4 using the Command Prompt.

A. Step 1: by using Services (services.msc).

1. Press the [Windows+R] Button or use [Start-Run] to open the Run Command.

2. Type [services.msc] to run the [Services] feature.

How to turn off Windows 10 auto update by force to save internet quota. Tutorial on saving quota on Windows 10, turn off permanent updates, tips, tricks effective, steps, easy, fast, effective, sure way, turn off updates forever, stop downloading Windows 10 updates forever

3. Select the [Windows Updates] option in the right hand column, and double-click it so that the [Windows Update Properties (Local Computer)] window appears.

4. On the [General] tab, for the [Startup type] section, select the [Disabled] option. After that, press the [Stop] button.

How to turn off Windows 10 auto update by force to save internet quota. Tutorial on saving quota on Windows 10, turn off permanent updates, tips, tricks effective, steps, easy, fast, effective, sure way, turn off updates forever, stop downloading Windows 10 updates forever

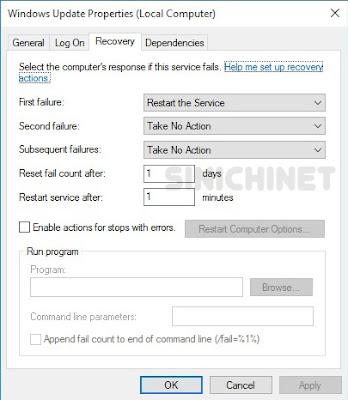
5. Select the [Recovery] tab. In the [First failure] section, change the [Restart the Service] option to [Take No Action]. Click the [Apply] and [OK] button.

How to turn off Windows 10 auto update by force to save internet quota. Tutorial on saving quota on Windows 10, turn off permanent updates, tips, tricks effective, steps, easy, fast, effective, sure way, turn off updates forever, stop downloading Windows 10 updates forever

B. Step 2: Using the Registry Editor (regedit).

We will change the data in the [wuauserv, WaaSMedicSvc, UsoSvc] section.

1. Press the [Windows+R] button or use [Start-Run] to open [Run Command].

2. Type [regedit] to run [Registry Editor].

3. Follow the navigation below:
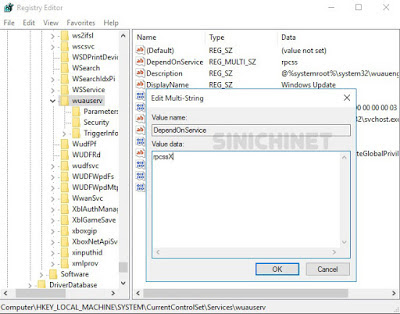
HKEY_LOCAL_MACHINE\SYSTEM\CurrentControlSet\Services\wuauserv

4. Change the data on [DependOnService] and [ImagePath].
  • DependOnService : change [rpcss] to [rpcssX].
  • ImagePath : change [%systemroot%\system32\svchost.exe -k netsvcs] to [%systemroot%\system32\svchostX.exe -k netsvcs]
How to turn off Windows 10 auto update by force to save internet quota. Tutorial on saving quota on Windows 10, turn off permanent updates, tips, tricks effective, steps, easy, fast, effective, sure way, turn off updates forever, stop downloading Windows 10 updates forever

How to turn off Windows 10 auto update by force to save internet quota. Tutorial on saving quota on Windows 10, turn off permanent updates, tips, tricks effective, steps, easy, fast, effective, sure way, turn off updates forever, stop downloading Windows 10 updates forever

5. Follow the navigation below:
HKEY_LOCAL_MACHINE\SYSTEM\CurrentControlSet\Services\WaaSMedicSvc

6. Double-click on the [Start] section, and change the number [3] to [4]. Then change the data on [DependOnService] and [ImagePath].
  • DependOnService : change [rpcss] to [rpcssX].
  • ImagePath : change [%systemroot%\system32\svchost.exe -k netsvcs] to [%systemroot%\system32\svchostX.exe -k netsvcs]

7. Follow the navigation below:
HKEY_LOCAL_MACHINE\SYSTEM\CurrentControlSet\Services\UsoSvc


8. Double-click on the [Start] section, and change the number [3] to [4]. Then change the data on [DependOnService] and [ImagePath].
  • DependOnService : change [rpcss] to [rpcssX].
  • ImagePath : change [%systemroot%\system32\svchost.exe -k netsvcs] to [%systemroot%\system32\svchostX.exe -k netsvcs]

C. Step 3 : Using File Explorer.

1. Press the [Windows+E] button or use [Start-Windows System-File Explorer].

2. Follow the following navigation: C:\Windows\SoftwareDistribution.

3. Delete all folders & files contained in the Download folder.

The next step is: take over [permission] from [System] on the file:
  • wuaueng.dll
  • wuauclt.exe
  • WaaSMedicAgent.exe
  • WaaSMedicSvc.dll
  • WaaSMedicCapsule.dll
  • WaaSMedicPS.dll
  • UsoClient.exe
  • usosvc.dll

All files can be found at C:\Windows\System32\

4. Find the [wuaueng.dll] file by following this navigation:
C:\Windows\System32\wuaueng.dll

5. Right-click on the file and select the [Properties] option. Then select the [Security] tab, and click the [Advance] button to open the [Advance Security Settings] window.

How to turn off Windows 10 auto update by force to save internet quota. Tutorial on saving quota on Windows 10, turn off permanent updates, tips, tricks effective, steps, easy, fast, effective, sure way, turn off updates forever, stop downloading Windows 10 updates forever

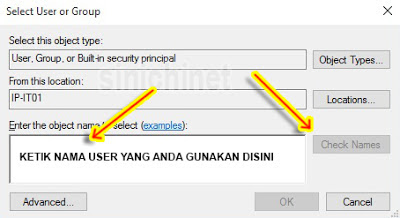
6. In the [Owner] section, click on [Change]. Type your username, then press the [Check Names] button, then the [OK] button. Continue clicking the [OK] button next, until the [Properties] window closes. We must close the [Properties] window first so that the addition of the user name that we did earlier was processed by the Windows system.

How to turn off Windows 10 auto update by force to save internet quota. Tutorial on saving quota on Windows 10, turn off permanent updates, tips, tricks effective, steps, easy, fast, effective, sure way, turn off updates forever, stop downloading Windows 10 updates forever

7. Repeat method No.5 for the [wuaueng.dll] file to open the [Advance Security Settings] window again.

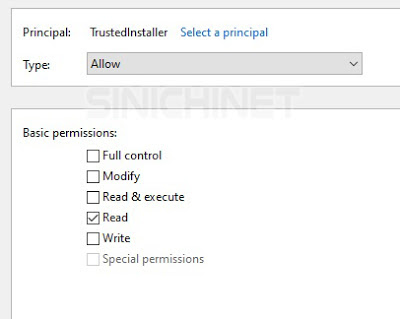
8. Double click on one of the names in the Principal column (such as TrustedInstaller), so that the [Permission Entry] window appears. Remove all check marks except for the read section in the [Basic Permission] section Then press the OK button.

How to turn off Windows 10 auto update by force to save internet quota. Tutorial on saving quota on Windows 10, turn off permanent updates, tips, tricks effective, steps, easy, fast, effective, sure way, turn off updates forever, stop downloading Windows 10 updates forever

9. Perform step no.8 on all [Principal]. Then click the [Apply] and [OK] button. Continue clicking the [OK] button until the [Properties] window closes.

10. Repeat steps No.5 through No.9 for all of the following files: wuauclt.exe, WaaSMedicAgent.exe, WaaSMedicSvc.dll, WaaSMedicCapsule.dll, WaaSMedicPS.dll, UsoClient.exe, and usosvc.dll.

D. Step 4 : Using Command Prompt.

1. Follow the navigation below: Start - Windows System - Command Prompt.

2. Run [Command Prompt] as [Administrator].

3. Type or copy the command below then press Enter.
takeown /f "%windir%\System32\UsoClient.exe" /a

4. Continue by typing or copy the command below and press Enter.
icacls "%windir%\System32\UsoClient.exe" /inheritance:r /remove "Administrators" "Authenticated Users" "Users" "System"

Note: If you want to run the [UsoClient] feature again, because you want to update Windows, you can use the following command:
icalcs "%windir%\System32\UsoClient.exe" /reset

5. Restart your computer.

Hopefully this article can be useful for those of you who need it.

Saturday, August 17, 2019

Beheben des Fehlers [Cannot Create File] beim Öffnen eines Anhangs in Microsoft Outlook

Haben Sie jemals ein Problem beim Öffnen eines E-Mail-Anhangs in Microsoft Outlook festgestellt?

Cannot create file: Example.xls. Right-click the folder you want to create the file in, and then click Properties on the shortcut menu to check your permissions for the folder.

Beheben des Fehlers "Datei kann nicht erstellt werden" beim Öffnen von Anhängen In Outlook können Outlook-Anhänge nicht gespeichert, nicht geöffnet, Outlook-E-Mail-Anhänge nicht gespeichert werden, Anhangsfehler, How To Solve “Can’t Create File” Error When Opening Attachment On Outlook, outlook attachments cannot be saved, cannot be opened, cannot save outlook email attachments, attachment error

Warum tritt das Problem [Can’t create file: filename] auf?

Dieses Problem tritt normalerweise auf, weil Outlook nicht auf die zugeordnete temporäre Datei zugreifen kann, sodass Sie Outlook-E-Mail-Anhänge nicht speichern können. Gehen Sie folgendermaßen vor um dieses Problem zu beheben:

1. Drücken Sie die Taste [Windows + R] oder [Start » Run], um [Run Command] zu öffnen.

2. Geben Sie [regedit] ein, um den [Registry Editor] auszuführen.

3. Klicken Sie auf [Edit » Find] und geben Sie OutlookSecureTempFolder ein. Oder folgen Sie einfach der folgenden Navigation:
HKEY_CURRENT_USER\Software\Microsoft\Office\<version*>\Outlook\Security

Hinweis: <Version *> ist die Version von Microsoft Outlook, die Sie verwenden. Wenn Sie Outlook 2016 verwenden, heißt es 16.0. Beispiel: HKEY_CURRENT_USER\Software\Microsoft\Office\16.0\Outlook\Security

4. Klicken Sie zweimal auf [OutlookSecureTempFolder]. Das Fenster [Edit String] wird angezeigt. Dort finden Sie den Speicherort der temporären Outlook-Datei. Es ist möglich, dass dies einer der folgenden Standorte ist:

  • C:\Documents and Settings\ username \Local Settings\Temporary Internet Files\Content.Outlook
  • C:\Documents and Settings\username\Local Settings\Temporary Internet Files\OLKfoldername
  • C:\Documents and Settings\username\Local Settings\Temporary Internet Files\OLKrandomnumber
  • C:\Users\username\AppData\Local\Microsoft\Windows\Temporary Internet Files\Content.Outlook
  • C:\Users\username\AppData\Local\Microsoft\Windows\INetCache\ Content.Outlook\randomnumber

5. Nachdem Sie den genauen Speicherort der Datei [OutlookSecureTempFolder] gefunden haben, öffnen Sie [Windows Explorer] und navigieren Sie zu dem zuvor aufgelisteten Speicherort. Löschen Sie alle Dateien im Ordner.

6. Starten Sie Ihr Microsoft Outlook neu

Wednesday, August 14, 2019

How To Solve “Cannot Create File” Error When Opening Attachment On Microsoft Outlook Outlook

Have you ever experienced a problem, when you want to open an email attachment in Microsoft Outlook, a warning appears:

Cannot create file: Example.xls. Right-click the folder you want to create the file in, and then click Properties on the shortcut menu tocheck your permissions for the folder.

How To Solve “Can’t Create File” Error When Opening Attachment On Outlook, outlook attachments cannot be saved, cannot be opened, cannot save outlook email attachments, attachment error

Why does this "Can’t create file: filename" problem occur?

This problem usually occurs because Outlook cannot access the linked temp file so you cannot save Outlook email attachments. To resolve this problem, try the following steps:

1. Press the [Windows + R] button, or [Start » Run] to open [Run Command].

2. Type regedit to run [Registry Editor].

3. Click [Edit » Find] and type OutlookSecureTempFolder. Or you can simply follow the following navigation:
HKEY_CURRENT_USER\Software\Microsoft\Office\<version*>\Outlook\Security

Note: <version *> is the version of Microsoft Outlook that you are using. If you use Outlook 2016 then it says 16.0. Example: HKEY_CURRENT_USER\Software\Microsoft\Office\16.0\Outlook\Security

4. Click 2x on [OutlookSecureTempFolder] and the [Edit String] window will appear.
There, you will find where the Outlook Temporary File is located. There is a possibility it could be from one of the following locations:

  • C:\Documents and Settings\ username \Local Settings\Temporary Internet Files\Content.Outlook
  • C:\Documents and Settings\username\Local Settings\Temporary Internet Files\OLKfoldername
  • C:\Documents and Settings\username\Local Settings\Temporary Internet Files\OLKrandomnumber
  • C:\Users\username\AppData\Local\Microsoft\Windows\Temporary Internet Files\Content.Outlook
  • C:\Users\username\AppData\Local\Microsoft\Windows\INetCache\ Content.Outlook\randomnumber

5. After finding the exact location of the [OutlookSecureTempFolder] file, open [Windows Explorer] and navigate to the location previously listed. Delete all files in the folder.

6. Restart your Microsoft Outlook

Saturday, August 3, 2019

How To Fix [Error 1935] When Installing Microsoft Office 2013 & 2016 On Microsoft Windows 10

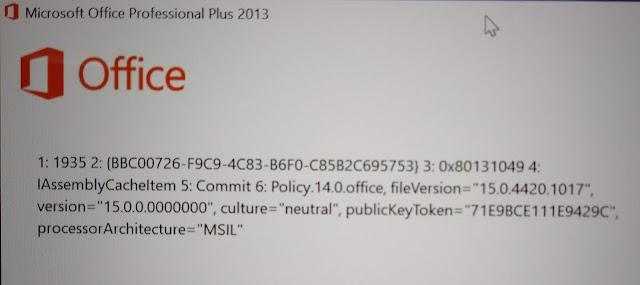
Have you ever experienced an error when installing Microsoft Office Professional Plus 2013 or 2016 on Windows10, and a warning appears as below?

1: 1935 2: {BBC00726-F9C9-4C83-B6F0-C85B2C695753) 3: 0x80131049 4:
IAssemblyCacheltem 5: Commit 6: Policy.14.0.office, fileVersion= "15.0.4420.1017",
version="15.0.0.0000000", culture= "neutral", publicKeyToken="71E9BCE111E9429C",
processorAfchitecture="MSIL"


How to fix "Error 1935" when installing Microsoft Office 2013 & 2016 on Microsoft Windows 10, Easy Ways to Resolve Errors When Installing Microsoft Office 2013 and 2016 on Microsoft Windows 10, error 1: 1935, how to, tips, tricks, tutorials,

If you are facing this problem, don't panic. Try the tutorial that we present below. These tips are guaranteed to be 98% successful, and we've tried it on Microsoft Windows Version 1809 (OS Build 17763.195).

How to fix "Error 1935" when installing Microsoft Office 2013 & 2016 on Microsoft Windows 10?

1. Press the [Windows + R] Button, or through Start - Run to open the Run Command.
2. Type regedit to run the Registry Editor feature.

How to fix "Error 1935" when installing Microsoft Office 2013 & 2016 on Microsoft Windows 10, Easy Ways to Resolve Errors When Installing Microsoft Office 2013 and 2016 on Microsoft Windows 10, error 1: 1935, how to, tips, tricks, tutorials,

3. Follow the navigation: Computer\HKEY_LOCAL_MACHINE\SOFTWARE\Microsoft\AppModel
4. Change (Rename) AppModel to AppModel.old
5. Restart the computer and try again to install your Microsoft Office.

Okay, thus the article "How to fix "Error 1935" when installing Microsoft Office 2013 & 2016 on Microsoft Windows 10". Hopefully this article useful for you.

Saturday, June 15, 2019

Hoe Bestanden En Mappen Die Verborgen Zijn Door Een Virus Te Herstellen (Door Notepad Te Gebruiken)

Computergebruikers op basis van Windows OS moeten bekend zijn met Computer Virus. En een van de slechte dingen die door deze virussen wordt veroorzaakt, is het verlies van gegevens en mappen op onze harde schijf, geheugen en pendrive.

Het moet erg vervelend zijn als onze belangrijke gegevens zoals kantoorwerk, schoolwerk, proefschrift of gedenkwaardige foto's plotseling verloren gaan. Hoewel de gegevens / map eigenlijk niet echt verloren is, alleen verborgen op dezelfde plek door het virus.

Hoe bestanden en mappen die verborgen zijn door een virus te herstellen (door Notepad te gebruiken)?

Voordat u verloren bestanden / mappen herstelt, moet u eerst controleren of uw antivirus is bijgewerkt. Waarom? omdat als de antivirus op uw computer niet correct werkt, het bestand dat u later hebt gevonden, weer door het virus wordt verborgen. En natuurlijk willen we niet dat dit gebeurt.

Ik gebruik tegelijkertijd twee antivirusprogramma's, Avast en SmadAV. Beide antivirussen interfereren niet met elkaar, integendeel, het zal elkaar aanvullen.

Nou, laten we teruggaan naar het grootste probleem. Er zijn eigenlijk verschillende manieren om bestanden / mappen te herstellen die zijn verborgen door een virus, maar deze keer gebruiken we Kladblok.

Volg de stappen:

1. Open Kladblok. In Windows7 bevindt Kladblok zich in: Start -> All Programs -> Accessories -> Notepad.

2. Typ het commando. Typ "attrib -s -h -r *. * / S / d" (zonder aanhalingstekens) in Kladblok, sla het op en geef het een naam zoals je wilt.

Hoe verborgen bestanden en mappen te herstellen met Kladblok, antivirus, verborgen bestanden, verloren bestanden, windows, txt, bat, attrib, tutorial, gids, tips, trucs, verloren bestanden herstellen, attrib -s -h -r *. * / s / d, virusaanval

3. Wijzig de extensie. Wijzig de extensie van .txt naar .bat, zoals: hidden.txt wordt hidden.bat

Hoe verborgen bestanden en mappen te herstellen met Kladblok, antivirus, verborgen bestanden, verloren bestanden, windows, txt, bat, attrib, tutorial, gids, tips, trucs, verloren bestanden herstellen, attrib -s -h -r *. * / s / d, virusaanval

4. Kopieer het bestand. Kopieer het .bat-bestand naar het station of pendrive waar het verloren bestand / map zich bevindt.

5. Excecute Command. Druk 2x op het .bat-bestand en wacht totdat het opdrachtpromptvenster verdwijnt. Hierna zullen de bestanden die door het virus zijn verborgen opnieuw verschijnen.

Hopelijk kan deze tutorial je helpen.

Thursday, June 13, 2019

Hoe te repareren "Firefox Is Already Running" Foutbericht

Heb je ooit Mozilla Firefox gestart maar er verschijnt een waarschuwingsbericht?
De waarschuwing is "Firefox is already running, but is not responding. To open a new window, you must first close the existing Firefox process, or restart your system."

Als u het bovenstaande probleem tegenkomt, is er een eenvoudige manier om het op te lossen.

Hoe te repareren "Firefox is al actief" Foutmelding, Windows, browser, applicatie, probleemoplossing, zelfstudie, tips, handleiding, Firefox Is Already Running, firefox error massage


Hoe te repareren ""Firefox Is Already Running" Foutbericht?

# Alt + Ctrl + Del. Druk tegelijkertijd op de toetsen Alt, Ctrl en Del op uw toetsenbord totdat een blauw scherm verschijnt. Selecteer de optie "Start Task Manager".

# Windows Task Manager. Zodra het venster "Windows Task Manager" verschijnt, opent u het tabblad "Processes" en selecteert u "firefox.exe".

# End Process. Nadat u "firefox.exe" hebt geselecteerd, drukt u op de knop "End Process" of "End Task"

Hoe te repareren "Firefox is al actief" Foutmelding, Windows, browser, applicatie, probleemoplossing, zelfstudie, tips, handleiding, Firefox Is Already Running, firefox error massage

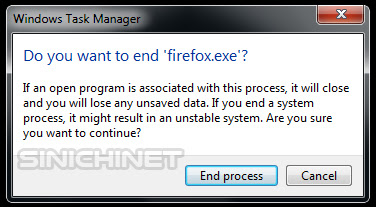
# Bevestigingsvenster. Als het bevestigingsvenster "Windows Task Manager" verschijnt, drukt u nogmaals op de knop "End Process".

Hoe te repareren "Firefox is al actief" Foutmelding, Windows, browser, applicatie, probleemoplossing, zelfstudie, tips, handleiding, Firefox Is Already Running, firefox error massage

U kunt uw favoriete browser "Firefox Mozilla" opnieuw openen.

Hopelijk kan dit artikel nuttig zijn om u te helpen.

Sunday, April 14, 2019

How to Block USB-Storage (pen drives & External Hard Drive) on Windows 7, 8 and 10

If you ask, what are the benefits of blocking USB-Storage, or blocking a Pen Drive and an external hard drive? Actually there are many benefits, but the two most important are:

  1. Securing or preventing theft of important data & documents on a computer by using USB-storage.
  2. Preventing transmission of viruses from pendrive & external hard drives.
How to Block USB-Storage (pen drives & External Hard Drive) on Windows 7, 8 and 10?

There are 2 easy ways, using the Registry Editor & Local Group Policy Editor in Windows. You can chose one of them.

A. Using Registry Editor (regedit)

  1. Press Windows+ R keys or through Start - Run to open Run Command.
  2. Type regedit to run the Registry Editor.
  3. Follow the following navigation: HKEY_LOCAL_MACHINE \ SYSTEM \ CurrentControlSet \ Services \ USBSTOR
  4. In the right column, click 2x on Start.
  5. In the Value data section, change the number 3 to number 4. Click the OK button.

how to block Pen drives, flasdisk, external hard drive, tips, tricks, win7, win10, prevent the spread of flashdisk viruses, prevent data theft


B. Using the Local Group Policy Editor (gpedit.msc)
  1. Press Windows+ R keys or through Start - Run to open Run Command.
  2. Type gpedit.msc to run the Local Group Policy Editor.
  3. Follow the following navigation: Computer Configuration \ Administrator Templates \ System \ Removable Storage Access.
  4. In the right column, click 2x on All Removeable Storage classes: Deny all access
  5. Select the Enable option, and click Apply.
how to block Pen drives, flasdisk, external hard drive, tips, tricks, win7, win10, prevent the spread of flashdisk viruses, prevent data theft


That's the tutorial How to Block USB-Storage (pen drives & External Hard Drive) on Windows 7, 8 and 10. Hopefully it can be useful for you.

Monday, April 8, 2019

How To Permanently Turn Off Windows 10 Update With 3 Easy Steps

Windows 10 has set Windows updates automatically. But sometimes Win10 updates actually feel very annoying to users. In addition to wasteful quota (for users with limited internet quota), the Windows Updater process that runs, can slow down the performance of your Windows 10.

For those of you who want to know how to turn off Windows 10 Update, we have provided the tutorial and 100% works. We have tried this tutorial on Windows 10 Home Version 1803 (OS Build 17134,648).

How To Permanently Turn Off Windows 10 Update?

There are 3 steps that must be done to permanently turn off Windows10 Update. A & B step to disable the updater, and step C to redirect the update link to the Windows server. step C is actually just in case the updater is active again without knowing why, or if someone activates it without our knowledge.

A. Via Command Prompt.

1. Follow the following navigation: Start/All Apps/Windows System/Command Prompt.
2. Right-click on the Command Prompt and select Run as administrator.

How to turn off Windows10 auto update by force to save internet quota. Tutorial to save quota on Windows10, turn off permanent updates, tips, effective tricks, steps, easy, fast, sure way, turn off updates forever

3. At the Command Prompt, type the following 2 commands:

sc.exe config wuauserv start= disabled
sc.exe stop wuauserv

If the response that comes out in the Command Prompt matches the image below, then step 1 has succeeded, and please proceed to the next step.

How to turn off Windows10 auto update by force to save internet quota. Tutorial to save quota on Windows10, turn off permanent updates, tips, effective tricks, steps, easy, fast, sure way, turn off updates forever

B. Through Services (services.msc). This second step is to help complete the process in the first step.

1. Press Windows+ R keys or through Start - Run to open Run Command.
2. Type services.msc to run the Services feature.

How to turn off Windows10 auto update by force to save internet quota. Tutorial to save quota on Windows10, turn off permanent updates, tips, effective tricks, steps, easy, fast, sure way, turn off updates forever

3. In the right column select the Windows Updates option, and click 2x so that the Windows Update Properties (Local Computer) window appears.
4. Select the Recovery tab. In First failure, change the Restart the Service option to Take No Action. Click the Apply and OK button.

How to turn off Windows10 auto update by force to save internet quota. Tutorial to save quota on Windows10, turn off permanent updates, tips, effective tricks, steps, easy, fast, sure way, turn off updates forever

C. Through Registry Editor (regedit). Actually the 2 steps above are enough, but step 3 is better to be done just in case.

1. Press Windows+ R keys or through Start - Run to open Run Command.
2. Type regedit to run the Registry Editor.
3. Follow the following navigation: HKEY_LOCAL_MACHINE\SYSTEM\CurrentControlSet\Services\wuauserv
4. We will modify the data in DependOnService and ImagePath.

  • DependOnService : rpcss changed to rpcssX
  • ImagePath : %systemroot%\system32\svchost.exe -k netsvcs changed to %systemroot%\system32\svchostX.exe -k netsvcs
For more details, please see the 2 images below:
How to turn off Windows10 auto update by force to save internet quota. Tutorial to save quota on Windows10, turn off permanent updates, tips, effective tricks, steps, easy, fast, sure way, turn off updates forever

Well, that's the tutorial How to Permanently Turn Off Windows10 Update with 3 Steps. Hopefully it can be useful for you.

Thursday, April 5, 2018

How To Remove The Canon Pixma iP2770 Printer Case Cover

As a Canon iP2770 printer user, you should know, at least a few things, about how to do light maintenance when necessary. This is because, in addition to cost savings, we can also save time than sending our printer to a service center or call a technician.

For example there is paper jammed on the printer, and when you pick it up there is a scrap of paper left in the printer. So inevitably you have to disassemble your Canon printer.

No need to be confused, just remove the top casing of the printer cover, and you can easily take the pieces of paper.

how to remove the top cover of Canon Printer PIXMA iP 2770, How To Open Printer Case, How to Unload Printer, Guide, Unloading printer, troubleshooting and mainteance, printer service, printer service, repair your own printer

How To Remove The Canon Pixma iP2770 Printer Case Cover?

# Open the top cover. Open the top cover of the printer to locate the screws and locks.

how to remove the top cover of Canon Printer PIXMA iP 2770, How To Open Printer Case, How to Unload Printer, Guide, Unloading printer, troubleshooting and mainteance, printer service, printer service, repair your own printer

# Open screws. There are 4 screws you have to open first. 2 pieces on the front (right and left), and 2 more on the top (right and left). The screw on the top lies inside the hole beside the hinge of the paper tray lid. For more details please see in the picture below.

how to remove the top cover of Canon Printer PIXMA iP 2770, How To Open Printer Case, How to Unload Printer, Guide, Unloading printer, troubleshooting and mainteance, printer service, printer service, repair your own printer

how to remove the top cover of Canon Printer PIXMA iP 2770, How To Open Printer Case, How to Unload Printer, Guide, Unloading printer, troubleshooting and mainteance, printer service, printer service, repair your own printer

# Open all Locks. After removing all screws, you can proceed by unlocking 3 locks located on the body of the printer. 2 locks are on the front, and 1 lock is on the back of the printer. Use the help of a screwdriver to pry the locks.

how to remove the top cover of Canon Printer PIXMA iP 2770, How To Open Printer Case, How to Unload Printer, Guide, Unloading printer, troubleshooting and mainteance, printer service, printer service, repair your own printer

how to remove the top cover of Canon Printer PIXMA iP 2770, How To Open Printer Case, How to Unload Printer, Guide, Unloading printer, troubleshooting and mainteance, printer service, printer service, repair your own printer

# Lift the casing up. After all the screws and locks are released, lift the casing up to remove it. No need to force to lift it.

how to remove the top cover of Canon Printer PIXMA iP 2770, How To Open Printer Case, How to Unload Printer, Guide, Unloading printer, troubleshooting and mainteance, printer service, printer service, repair your own printer

Sunday, April 1, 2018

How To Restore File And Folder That Hidden By Virus, By Using Notepad

For you, computer users based on Windows OS, must have been familiar with Computer Virus. And one of the bad things caused by these viruses is the loss of Data and Folders on our hard drive, memory, and pendrive.

It must be very inconvenient if our important data such as office work, schoolwork, thesis, or memorable photos, suddenly lost. Although the data / folder is actually not really lost, just hidden in the same place by the virus.

How to RestoreThe Missing Folders and Files That Hidden By Virus?

Before restoring lost files / folders, first make sure your antivirus is updated. Why? because if the antivirus on your computer does not do its job properly, then the file you have found later will be hidden once again by the virus. And of course we do not want that to happen.

I use 2 antivirus at once, Avast and SmadAV. Both antivirus will not interfere with each other, on the contrary, it will complement each other.

well, let's get back to the main problem. Actually there are several ways to restore files / folders hidden by virus, but this time we will only use Notepad.

Please follow the steps below:

1. Open Notepad. In Windows7, Notepad is located in Start -> All Programs -> Accessories -> Notepad.
2. Type The Command. Type "attrib -s -h -r *. * / s / d" (without quotation marks) in Notepad, then save and name it whatever you want.
How to Restore Hidden Files and Folders by Using Notepad, antivirus, hidden files, lost files, windows, txt, bat, attrib, tutorial, guide, tips, tricks, restore lost files, attrib -s -h -r * . * / s / d, virus attack

3. Change The Extention. Change the extention from .txt to .bat, such as: hidden.txt becomes hidden.bat
How to Restore Hidden Files and Folders by Using Notepad, antivirus, hidden files, lost files, windows, txt, bat, attrib, tutorial, guide, tips, tricks, restore lost files, attrib -s -h -r * . * / s / d, virus attack

4. Copy The File. Copy the .bat file to the drive or pendrive where the lost file / folder is located.
5. Excecute Command. Press 2x the .bat file, and wait until the Command Prompt window disappears. After that, the files hidden by the virus will reappear.

Hopefully this tutorial can help you.

Thursday, March 22, 2018

Ink Color Position In Canon Printer Color Cartridge

If you intend to self-refuel the color cartridge on a Canon printer, you must know the position of each color on the cartridge. Errors in determining color locations have a major impact on the results of the print process.

For the example, we use the CL-811 cartridge, which is used on Canon Pixma Printer iP-2770. Unlike black cartridges, color cartridges have 3 different color locations.

Ink Color Position In Canon Printer Color Cartridge, ink, red, magenta, blue, cyan, yellow, color sequence, ink hole, easy way of ink contents, refill ink, refill, sinichinet

To make it easier to know the three charging locations, remove the sticker / label on the cartridge. You can make a filling hole with a drill, screw, or nail.


The third color location arrangement is:
1. Red Color (Magenta): located at the top.
2. Blue Color (Cyan): located on the bottom left.
3. Yellow color (Yellow): located on the bottom right.

Ink Color Position In Canon Printer Color Cartridge, ink, red, magenta, blue, cyan, yellow, color sequence, ink hole, easy way of ink contents, refill ink, refill, sinichinet

The positions of those three colors apply to the following Canon Pixma color printer cartridges:
iP2770/ iP2772/ iP1180/ iP1200/ iP1300/ iP1600/ iP1700/ iP1880/ iP1890/ iP2200/ iP2580/ iP2680
MP145/ MP150/ MP160/ MP170/ MP180/ MP198/ MP218/ MP228/ MP450/ MP460/ MP476/ MP258/ MP268/ MP276/ MP287/ MP486/ MP296/ MP497
MX308/ MX318/ MX328/ MX338/ MX347/ MX357/ MX366/ MX416/ MX426

Thursday, July 27, 2017

How To Fix "Firefox Is Already Running" Error Message

Have you ever started Mozilla Firefox but a "Firefox is already running, but is not responding. To open a new window, you must first close the existing Firefox process, or restart your system." warning appears?

If you encounter the above problem, there is an easy way to solve it.

How To Fix "Firefox Is Already Running" Error Message, windows, browser, application, troubleshooting

How To Fix "Firefox Is Already Running" Error Message?

# Alt+Ctrl+Del. Press the Alt, Ctrl, Del keys on your keyboard simultaneously until a blue screen appears. Select the "Start Task Manager" option.

# Windows Task Manager. Once the "Windows Task Manager" window appears, open the "Processes" tab and select "firefox.exe".

# End Process. After selecting "firefox.exe" press the "End Process" or "End Task" button

How To Fix "Firefox Is Already Running" Error Message, windows, browser, application, troubleshooting

# Confirmation window. If the "Windows Task Manager" confirmation window appears, press the "End process" button again.

How To Fix "Firefox Is Already Running" Error Message, windows, browser, application, troubleshooting

You can reopen your favorite browser "Firefox Mozilla". Hopefully this article How To Fix "Firefox Is Already Running" Error Message can be useful to help you.

Friday, August 26, 2016

Canon iP2770 Printer - The Power Of Printer Automatically Turn Off

Sinichinet - If you have a Canon iP2770 printer, which always suddenly turns itself off if not used every hour or some time, don't worry. Your printer does not encounter any errors. That, due to the Auto Power Off feature, which is on a Canon iP2770 printer software is running.

There's a good side as well if we use the Auto Power Off feature, which can save electricity consumption. On the other hand, it creates inconvenience to the user, due to the need to always press the POWER button first if a user wanted to print.


Choose The Printer. First open the Devices and Printers window via Start > Devices and Printers .
Select the Canon iP2770 printer and right-click on the mouse. Select the option Printer properties.

printer, error, tips, tricks, tutorial, canon, ip2770, printer turns off, automatically shuts down, always turns off every 1 hour, shutdown itself, step by step, automatically shutdown, how to fix, error

Maintenence Tab. At Canon iP2700 series Properties window, select the Maintenance tab and click the Auto Power.

printer, error, tips, tricks, tutorial, canon, ip2770, printer turns off, automatically shuts down, always turns off every 1 hour, shutdown itself, step by step, automatically shutdown, how to fix, error

Auto Power Settings. In the Auto Power Settings window, for the Auto Power Off, select the Disable option (see the example image below.)

printer, error, tips, tricks, tutorial, canon, ip2770, printer turns off, automatically shuts down, always turns off every 1 hour, shutdown itself, step by step, automatically shutdown, how to fix, error

Write Settings. When the warning "Write settings to printer?" appears, press the OK button. Your Canon iP2770 printer will never off automatically again. Even if you have not used it for some time.

printer, error, tips, tricks, tutorial, canon, ip2770, printer turns off, automatically shuts down, always turns off every 1 hour, shutdown itself, step by step, automatically shutdown, how to fix, error

Wednesday, August 24, 2016

How To Solve EDIT WINDOWS BOOT OPTION Error For Windows 7

Do you ever run into a problem when turning on or booting your computer using OS (Operating System) Windows 7, and pops up an alert/warning such as :

Edit Windows boot options for : Windows 7
Path: \windows\system32\winload.exe
Partition : 2
Hard Disk : 4db0b0f5 (the numbers on the hard disk can be changed depending on your hard disk)
[ /NOEXECUTE=OPTIN]

booting windows 7, booting gagal, gagal masuk windows, komputer tidak bisa booting, laptop gagal masuk windows, booting error, how to fix, noexecute, winload, optionedit, window startup, boot failure


Actually, if you have this problem, you can still use Windows, and your data in the PC will not be lost. But these issues are very disturbing because we have to press the ENTER key first in order to get into Windows.

How to fix the Edit Windows Boot Option For Windows 7? Please follow these steps :
  • First , open a Command Crompt as an Administrator.
  • Then type the following command : bcdedit / set optionsedit no and press ENTER.
  • If successful, it will look like the image below :

booting windows 7, boot failed, failed to enter windows, computer can't boot, laptop failed to enter windows, boot error, how to fix, noexecute, winload, optionedit, startup window, boot failure

Please restart your computer and your Windows 7 boot problem has been resolved .

Thus the article how to fix the Edit Windows Boot Option For Windows 7. #bootingwindows #windows7 #os #operatingsystem #komputer #laptop

Tuesday, September 24, 2013

HOW TO CLEAN YOUR CPU

Cleaning the CPU is a necessity that must be done, because the dirty CPU will cause the computer to not function properly. Therefore, now SINICHINET will provide easy tips on how to clean your cpu.

1. Unplug all cables connected to the CPU, either the power cord or cables of peripheral / other devices (keyboard, mouse, monitor, printer, etc.)
2. Open the CPU casing (how to open it depending on the type and model of each casing)

3. Remove the components that contained in the CPU. To facilitate removing the components, just lay your CPU.
  • Remove the Power Supply. Unplug all cables from the power supply connected to the other parts such as the motherboard, VGA card, DVD rom, and hard disks. Remove the power supply's screws that are usually seen on the back of the CPU casing. 
  • next step .. remove the RAM, hard disk, VGA card (if any), ROM, floppy.
  •  If you feel able to... remove the heatsink as well. If you do not feel confident to do it, you can ask someone that more expert. but look at how to take it off, so next time you can do it yourself. 
  • After successfully removing the heatsink, remove the processor as well. But do it carefully! Once again, if you are not confident, you can ask someone more expert.
  • Remove the motherboard from the CPU casing.
4. Stages of cleaning. just use a small brush, use a blower if you have any. Do not use any liquid to clean all components of the CPU.
  • Power supply, ROM, and Floppy : adequately cleaned using a brush so that the dust is gone. 
  • RAM and VGA card : clean the dust with a brush. Note the golden section components. if the color is muddy or not shiny, immediately rub with a pencil eraser.
  • Heatsink : clean it with a brush. if possible, separate the metal heatsink and fan that optimal cleaning results.
  • Processor : clean it with a brush. frequently there is a crust on the top of the former processor. it is the thermal paste (pasta) which dries. clean it carefully using a flat tip screwdriver or other tool.
  • Motherboard : clean the dust with a brush slowly. do not miss the sidelines of the connector slot For RAM, VGA card, etc..
  • Lastly, clean the CPU casing

how to clean CPU, easy way to clen CPU, easy way to clean computer, dirty CPU, dirty computer, bad CPU, bad computer, cleaning CPU, cleaning computer, easy tips how to clean CPU, easy tips how to clean computer

5. Re-assembly stage
  • Put the motherboard back in the case (if it was removed).
  • Put the processor on the motherboard. then apply thermal paste thinly and evenly on the surface of the processor that will be in contact with the heatsink. If the processor can not be installed properly should not be forced, because there is the possibility of mounting positions processor has inverted / wrong.
  • Combine first heatsink and fan. after that, put enough thermal paste on the heatsink surface that will be in direct contact with the processor and install the heatsink on the motherboard. Do not forget to install the fan cable on the motherboard.
  • Installation of Ram. In the RAM slots there is a divider / small bulkhead that divides the slot into 2 or 3 sections. note the bulkhead. If mounting upside down, the RAM will not be installed in the slot. if the RAM mounting position is correct, press both ends of the RAM so RAM is installed in the slot and locks automatically.
  • Attach the PSU (power Suplay Unit). Attach the cable that was originally connected to the motherboard.
  • Attach a VGA card in the slot. Do not forget to plug the power cord if any power plugs. Latest VGA cards usually have the plugs.
  • Put the hard disk and DVD Rom. Connect the power cord from the power supply, also the data cable to the motherboard.
  • Put lid CPU casing and plug all the cables that were originally connected to the CPU, such as the power cord, keyboard, mouse, monitor.

6. Turn on the CPU


Thus easy tips on how to clean your CPU, and i hope this tips can be useful for you all.