Showing posts with label Computer En. Show all posts

Monday, April 8, 2019

How To Permanently Turn Off Windows 10 Update With 3 Easy Steps

Windows 10 has set Windows updates automatically. But sometimes Win10 updates actually feel very annoying to users. In addition to wasteful quota (for users with limited internet quota), the Windows Updater process that runs, can slow down the performance of your Windows 10.

For those of you who want to know how to turn off Windows 10 Update, we have provided the tutorial and 100% works. We have tried this tutorial on Windows 10 Home Version 1803 (OS Build 17134,648).

How To Permanently Turn Off Windows 10 Update?

There are 3 steps that must be done to permanently turn off Windows10 Update. A & B step to disable the updater, and step C to redirect the update link to the Windows server. step C is actually just in case the updater is active again without knowing why, or if someone activates it without our knowledge.

A. Via Command Prompt.

1. Follow the following navigation: Start/All Apps/Windows System/Command Prompt.
2. Right-click on the Command Prompt and select Run as administrator.

How to turn off Windows10 auto update by force to save internet quota. Tutorial to save quota on Windows10, turn off permanent updates, tips, effective tricks, steps, easy, fast, sure way, turn off updates forever

3. At the Command Prompt, type the following 2 commands:

sc.exe config wuauserv start= disabled
sc.exe stop wuauserv

If the response that comes out in the Command Prompt matches the image below, then step 1 has succeeded, and please proceed to the next step.

How to turn off Windows10 auto update by force to save internet quota. Tutorial to save quota on Windows10, turn off permanent updates, tips, effective tricks, steps, easy, fast, sure way, turn off updates forever

B. Through Services (services.msc). This second step is to help complete the process in the first step.

1. Press Windows+ R keys or through Start - Run to open Run Command.
2. Type services.msc to run the Services feature.

How to turn off Windows10 auto update by force to save internet quota. Tutorial to save quota on Windows10, turn off permanent updates, tips, effective tricks, steps, easy, fast, sure way, turn off updates forever

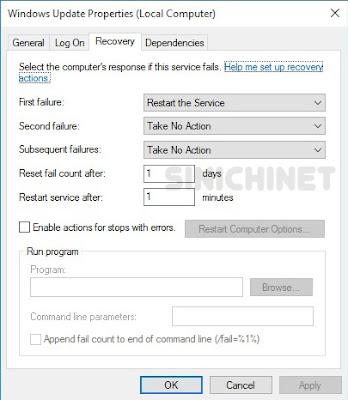
3. In the right column select the Windows Updates option, and click 2x so that the Windows Update Properties (Local Computer) window appears.
4. Select the Recovery tab. In First failure, change the Restart the Service option to Take No Action. Click the Apply and OK button.
How to turn off Windows10 auto update by force to save internet quota. Tutorial to save quota on Windows10, turn off permanent updates, tips, effective tricks, steps, easy, fast, sure way, turn off updates forever

C. Through Registry Editor (regedit). Actually the 2 steps above are enough, but step 3 is better to be done just in case.

1. Press Windows+ R keys or through Start - Run to open Run Command.
2. Type regedit to run the Registry Editor.
3. Follow the following navigation: HKEY_LOCAL_MACHINE\SYSTEM\CurrentControlSet\Services\wuauserv
4. We will modify the data in DependOnService and ImagePath.

  • DependOnService : rpcss changed to rpcssX
  • ImagePath : %systemroot%\system32\svchost.exe -k netsvcs changed to %systemroot%\system32\svchostX.exe -k netsvcs
For more details, please see the 2 images below:
How to turn off Windows10 auto update by force to save internet quota. Tutorial to save quota on Windows10, turn off permanent updates, tips, effective tricks, steps, easy, fast, sure way, turn off updates forever

Well, that's the tutorial How to Permanently Turn Off Windows10 Update with 3 Steps. Hopefully it can be useful for you.

Thursday, April 5, 2018

How To Remove The Canon Pixma iP2770 Printer Case Cover

As a Canon iP2770 printer user, you should know, at least a few things, about how to do light maintenance when necessary. This is because, in addition to cost savings, we can also save time than sending our printer to a service center or call a technician.

For example there is paper jammed on the printer, and when you pick it up there is a scrap of paper left in the printer. So inevitably you have to disassemble your Canon printer.

No need to be confused, just remove the top casing of the printer cover, and you can easily take the pieces of paper.

how to remove the top cover of Canon Printer PIXMA iP 2770, How To Open Printer Case, How to Unload Printer, Guide, Unloading printer, troubleshooting and mainteance, printer service, printer service, repair your own printer

How To Remove The Canon Pixma iP2770 Printer Case Cover?

# Open the top cover. Open the top cover of the printer to locate the screws and locks.

how to remove the top cover of Canon Printer PIXMA iP 2770, How To Open Printer Case, How to Unload Printer, Guide, Unloading printer, troubleshooting and mainteance, printer service, printer service, repair your own printer

# Open screws. There are 4 screws you have to open first. 2 pieces on the front (right and left), and 2 more on the top (right and left). The screw on the top lies inside the hole beside the hinge of the paper tray lid. For more details please see in the picture below.

how to remove the top cover of Canon Printer PIXMA iP 2770, How To Open Printer Case, How to Unload Printer, Guide, Unloading printer, troubleshooting and mainteance, printer service, printer service, repair your own printer

how to remove the top cover of Canon Printer PIXMA iP 2770, How To Open Printer Case, How to Unload Printer, Guide, Unloading printer, troubleshooting and mainteance, printer service, printer service, repair your own printer

# Open all Locks. After removing all screws, you can proceed by unlocking 3 locks located on the body of the printer. 2 locks are on the front, and 1 lock is on the back of the printer. Use the help of a screwdriver to pry the locks.

how to remove the top cover of Canon Printer PIXMA iP 2770, How To Open Printer Case, How to Unload Printer, Guide, Unloading printer, troubleshooting and mainteance, printer service, printer service, repair your own printer

how to remove the top cover of Canon Printer PIXMA iP 2770, How To Open Printer Case, How to Unload Printer, Guide, Unloading printer, troubleshooting and mainteance, printer service, printer service, repair your own printer

# Lift the casing up. After all the screws and locks are released, lift the casing up to remove it. No need to force to lift it.

how to remove the top cover of Canon Printer PIXMA iP 2770, How To Open Printer Case, How to Unload Printer, Guide, Unloading printer, troubleshooting and mainteance, printer service, printer service, repair your own printer

Sunday, April 1, 2018

How To Restore File And Folder That Hidden By Virus, By Using Notepad

For you, computer users based on Windows OS, must have been familiar with Computer Virus. And one of the bad things caused by these viruses is the loss of Data and Folders on our hard drive, memory, and pendrive.

It must be very inconvenient if our important data such as office work, schoolwork, thesis, or memorable photos, suddenly lost. Although the data / folder is actually not really lost, just hidden in the same place by the virus.

How to RestoreThe Missing Folders and Files That Hidden By Virus?

Before restoring lost files / folders, first make sure your antivirus is updated. Why? because if the antivirus on your computer does not do its job properly, then the file you have found later will be hidden once again by the virus. And of course we do not want that to happen.

I use 2 antivirus at once, Avast and SmadAV. Both antivirus will not interfere with each other, on the contrary, it will complement each other.

well, let's get back to the main problem. Actually there are several ways to restore files / folders hidden by virus, but this time we will only use Notepad.

Please follow the steps below:

1. Open Notepad. In Windows7, Notepad is located in Start -> All Programs -> Accessories -> Notepad.
2. Type The Command. Type "attrib -s -h -r *. * / s / d" (without quotation marks) in Notepad, then save and name it whatever you want.
How to Restore Hidden Files and Folders by Using Notepad, antivirus, hidden files, lost files, windows, txt, bat, attrib, tutorial, guide, tips, tricks, restore lost files, attrib -s -h -r * . * / s / d, virus attack

3. Change The Extention. Change the extention from .txt to .bat, such as: hidden.txt becomes hidden.bat
How to Restore Hidden Files and Folders by Using Notepad, antivirus, hidden files, lost files, windows, txt, bat, attrib, tutorial, guide, tips, tricks, restore lost files, attrib -s -h -r * . * / s / d, virus attack

4. Copy The File. Copy the .bat file to the drive or pendrive where the lost file / folder is located.
5. Excecute Command. Press 2x the .bat file, and wait until the Command Prompt window disappears. After that, the files hidden by the virus will reappear.

Hopefully this tutorial can help you.

Thursday, March 22, 2018

Ink Color Position In Canon Printer Color Cartridge

If you intend to self-refuel the color cartridge on a Canon printer, you must know the position of each color on the cartridge. Errors in determining color locations have a major impact on the results of the print process.

For the example, we use the CL-811 cartridge, which is used on Canon Pixma Printer iP-2770. Unlike black cartridges, color cartridges have 3 different color locations.

Ink Color Position In Canon Printer Color Cartridge, ink, red, magenta, blue, cyan, yellow, color sequence, ink hole, easy way of ink contents, refill ink, refill, sinichinet

To make it easier to know the three charging locations, remove the sticker / label on the cartridge. You can make a filling hole with a drill, screw, or nail.


The third color location arrangement is:
1. Red Color (Magenta): located at the top.
2. Blue Color (Cyan): located on the bottom left.
3. Yellow color (Yellow): located on the bottom right.

Ink Color Position In Canon Printer Color Cartridge, ink, red, magenta, blue, cyan, yellow, color sequence, ink hole, easy way of ink contents, refill ink, refill, sinichinet

The positions of those three colors apply to the following Canon Pixma color printer cartridges:
iP2770/ iP2772/ iP1180/ iP1200/ iP1300/ iP1600/ iP1700/ iP1880/ iP1890/ iP2200/ iP2580/ iP2680
MP145/ MP150/ MP160/ MP170/ MP180/ MP198/ MP218/ MP228/ MP450/ MP460/ MP476/ MP258/ MP268/ MP276/ MP287/ MP486/ MP296/ MP497
MX308/ MX318/ MX328/ MX338/ MX347/ MX357/ MX366/ MX416/ MX426

Thursday, July 27, 2017

How To Fix "Firefox Is Already Running" Error Message

Have you ever started Mozilla Firefox but a "Firefox is already running, but is not responding. To open a new window, you must first close the existing Firefox process, or restart your system." warning appears?

If you encounter the above problem, there is an easy way to solve it.

How To Fix "Firefox Is Already Running" Error Message, windows, browser, application, troubleshooting

How To Fix "Firefox Is Already Running" Error Message?

# Alt+Ctrl+Del. Press the Alt, Ctrl, Del keys on your keyboard simultaneously until a blue screen appears. Select the "Start Task Manager" option.

# Windows Task Manager. Once the "Windows Task Manager" window appears, open the "Processes" tab and select "firefox.exe".

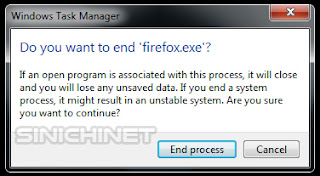
# End Process. After selecting "firefox.exe" press the "End Process" or "End Task" button

How To Fix "Firefox Is Already Running" Error Message, windows, browser, application, troubleshooting

# Confirmation window. If the "Windows Task Manager" confirmation window appears, press the "End process" button again.

How To Fix "Firefox Is Already Running" Error Message, windows, browser, application, troubleshooting

You can reopen your favorite browser "Firefox Mozilla". Hopefully this article How To Fix "Firefox Is Already Running" Error Message can be useful to help you.

Friday, August 26, 2016

Canon iP2770 Printer - The Power Of Printer Automatically Turn Off

Sinichinet - If you have a Canon iP2770 printer, which always suddenly turns itself off if not used every hour or some time, don't worry. Your printer does not encounter any errors. That, due to the Auto Power Off feature, which is on a Canon iP2770 printer software is running.

There's a good side as well if we use the Auto Power Off feature, which can save electricity consumption. On the other hand, it creates inconvenience to the user, due to the need to always press the POWER button first if a user wanted to print.


Choose The Printer. First open the Devices and Printers window via Start > Devices and Printers .
Select the Canon iP2770 printer and right-click on the mouse. Select the option Printer properties.

printer, error, tips, tricks, tutorial, canon, ip2770, printer turns off, automatically shuts down, always turns off every 1 hour, shutdown itself, step by step, automatically shutdown, how to fix, error

Maintenence Tab. At Canon iP2700 series Properties window, select the Maintenance tab and click the Auto Power.

printer, error, tips, tricks, tutorial, canon, ip2770, printer turns off, automatically shuts down, always turns off every 1 hour, shutdown itself, step by step, automatically shutdown, how to fix, error

Auto Power Settings. In the Auto Power Settings window, for the Auto Power Off, select the Disable option (see the example image below.)

printer, error, tips, tricks, tutorial, canon, ip2770, printer turns off, automatically shuts down, always turns off every 1 hour, shutdown itself, step by step, automatically shutdown, how to fix, error

Write Settings. When the warning "Write settings to printer?" appears, press the OK button. Your Canon iP2770 printer will never off automatically again. Even if you have not used it for some time.

printer, error, tips, tricks, tutorial, canon, ip2770, printer turns off, automatically shuts down, always turns off every 1 hour, shutdown itself, step by step, automatically shutdown, how to fix, error

Wednesday, August 24, 2016

How To Solve EDIT WINDOWS BOOT OPTION Error For Windows 7

Do you ever run into a problem when turning on or booting your computer using OS (Operating System) Windows 7, and pops up an alert/warning such as :

Edit Windows boot options for : Windows 7
Path: \windows\system32\winload.exe
Partition : 2
Hard Disk : 4db0b0f5 (the numbers on the hard disk can be changed depending on your hard disk)
[ /NOEXECUTE=OPTIN]

booting windows 7, booting gagal, gagal masuk windows, komputer tidak bisa booting, laptop gagal masuk windows, booting error, how to fix, noexecute, winload, optionedit, window startup, boot failure


Actually, if you have this problem, you can still use Windows, and your data in the PC will not be lost. But these issues are very disturbing because we have to press the ENTER key first in order to get into Windows.

How to fix the Edit Windows Boot Option For Windows 7? Please follow these steps :
  • First , open a Command Crompt as an Administrator.
  • Then type the following command : bcdedit / set optionsedit no and press ENTER.
  • If successful, it will look like the image below :

booting windows 7, boot failed, failed to enter windows, computer can't boot, laptop failed to enter windows, boot error, how to fix, noexecute, winload, optionedit, startup window, boot failure

Please restart your computer and your Windows 7 boot problem has been resolved .

Thus the article how to fix the Edit Windows Boot Option For Windows 7. #bootingwindows #windows7 #os #operatingsystem #komputer #laptop